How to Embed Klaviyo Forms on Shopify


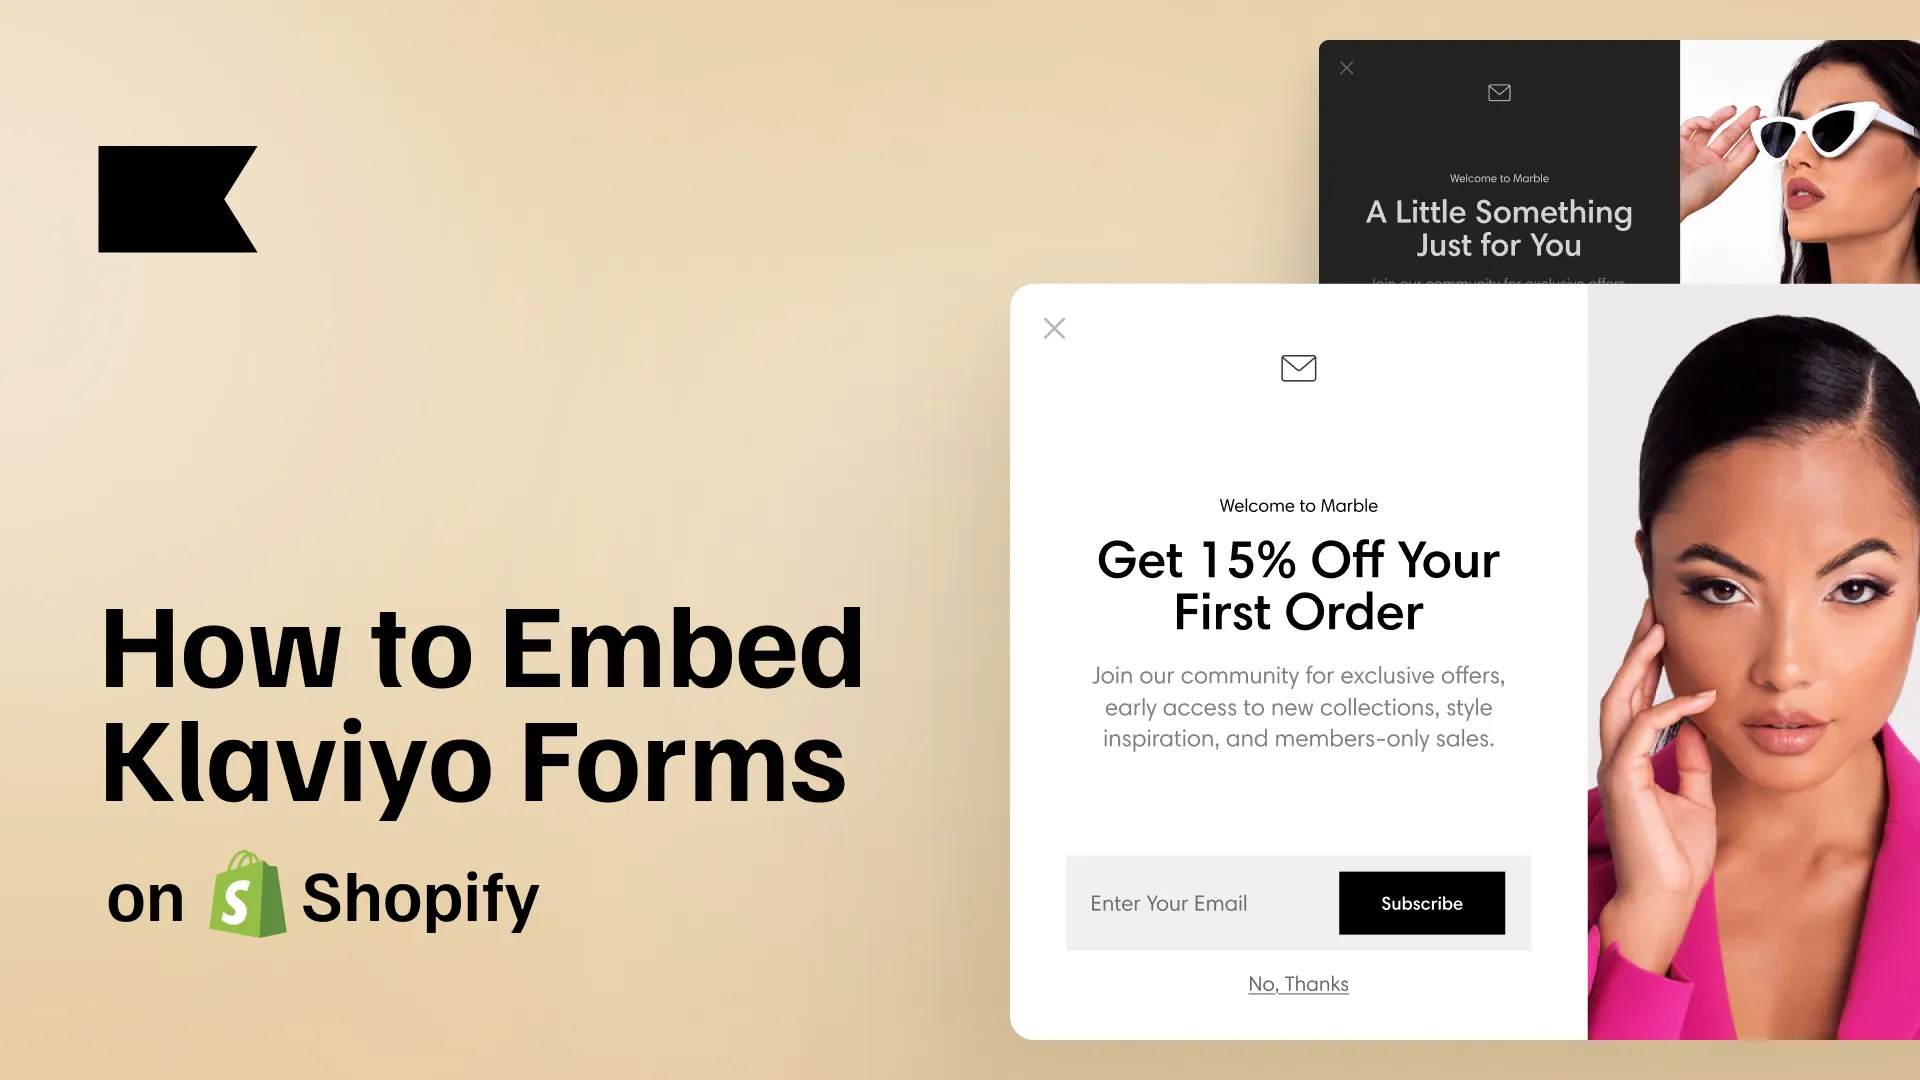
Klaviyo signup forms are one of the first things most Shopify stores should set up after connecting Klaviyo. They help you collect email subscribers, grow your SMS list, promote offers, and send new contacts into the right welcome flows.
But adding a Klaviyo form to Shopify is not always just one simple step. A popup form, an embedded form, and a full-page form can all work differently. Some forms appear automatically once Klaviyo is installed correctly on your store. Others need to be added to a specific Shopify page, section, or theme template.
In this guide, we’ll walk through how Klaviyo forms work on Shopify, how to create a signup form, how to add popup and embedded forms to your store, and what to check if your form is not showing correctly.
Klaviyo Forms and Shopify: What You Need to Know First
Klaviyo forms are created and managed inside Klaviyo, but Shopify controls where those forms appear on your storefront.
That means there are two sides to the setup:
- In Klaviyo, you create the form, choose the form type, connect it to a list, edit the design, and set targeting or display rules.
- In Shopify, you make sure Klaviyo can display forms on your store and, for embedded forms, place the form where you want it to appear.
Klaviyo supports several form types, including popup, flyout, full-page, and embedded forms. Popup and flyout forms are usually used for list growth offers, discounts, newsletter signup, or exit-intent campaigns. Embedded forms are placed directly on a page, such as a footer, landing page, blog post, or product page. Klaviyo’s own help documentation describes these form types and notes that embedded Shopify forms can be added by using the Klaviyo Embedded Form app and the form’s embed code.
Before you start building the form, it helps to know exactly what the form should do. A newsletter popup, a product waitlist form, and a footer signup form may all collect subscribers, but they should not always use the same message, placement, or follow-up flow.
Before You Start: Quick Checklist
Before you create or embed a Klaviyo form on Shopify, make sure the basic setup is ready.
- Your Klaviyo account is connected to Shopify.
- Klaviyo sign-up forms are enabled for your Shopify store.
- You know which Klaviyo list the form should submit to.
- You know where the form should appear: homepage, footer, product page, landing page, blog post, or another location.
- You have the form copy, offer, fields, CTA button, and success message ready.
- You have access to the Shopify theme editor if the form needs to be embedded on a page.
- You know which flow, if any, should start after someone submits the form.
For Shopify stores, Klaviyo says the app embed must be enabled for sign-up forms to work. Klaviyo also recommends enabling the Shopify app embed rather than manually installing Klaviyo.js in most cases.
How to Create a Klaviyo Signup Form for Shopify
Start by creating the form in Klaviyo. This is where you decide what type of form you want, what it should look like, and what happens after someone signs up.
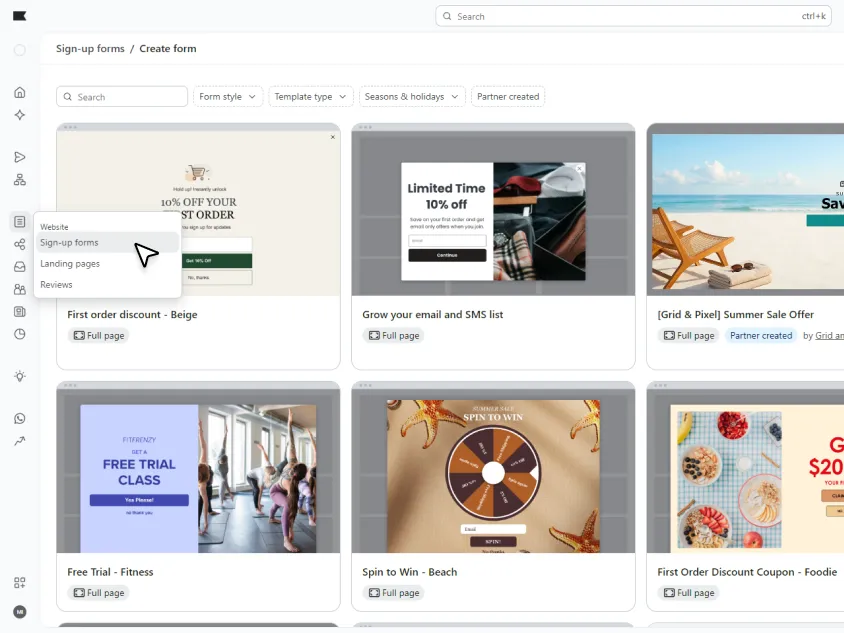
1. Go to Sign-up forms in Klaviyo
In Klaviyo, open the Sign-up forms area. This is where you can create new forms and manage existing ones.
From there, you can either start with a template or create a new form from scratch. Templates are useful if you want a faster starting point, but you should still customize the design, copy, fields, and success message so the form matches your Shopify store.
2. Choose the right form type
Klaviyo lets you create different types of signup forms. For Shopify stores, the most common choices are:
| Form type | Best for |
|---|---|
|
Popup |
Discount offers, newsletter signup, first-time visitor capture, exit-intent campaigns |
|
Flyout |
Softer signup prompts that feel less intrusive than a popup |
|
Embedded form |
Footer forms, landing pages, product pages, blog posts, and permanent signup sections |
|
Full-page form |
Dedicated signup campaigns or landing-page-style experiences |
For this article, the most important distinction is between popup/flyout forms and embedded forms. Popup and flyout forms usually appear based on display and targeting rules. Embedded forms need to be placed directly where you want them to appear on the Shopify store.
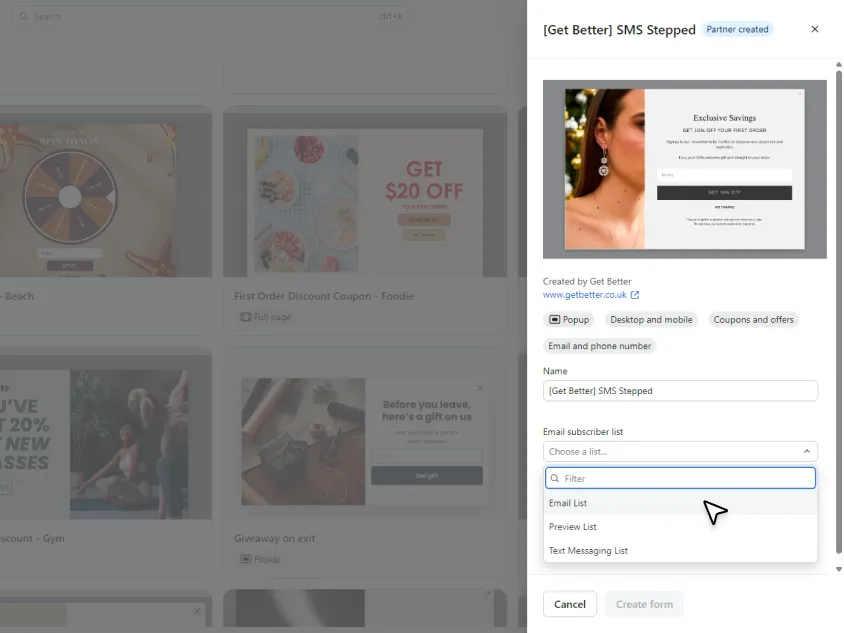
3. Select the list for new subscribers
Every Klaviyo form should submit subscribers to the correct list. For example, a general newsletter form may submit to your main email list, while a product-specific form may submit to a more specific list or segment.
This step matters because the list can affect what happens next. If a welcome flow is triggered by that list, anyone who submits the form may enter that flow.
Before publishing the form, confirm that:
- the form submits to the correct list;
- the list is connected to the right welcome flow, if needed;
- SMS consent is handled correctly if the form collects phone numbers;
- the form does not send subscribers into the wrong automation.
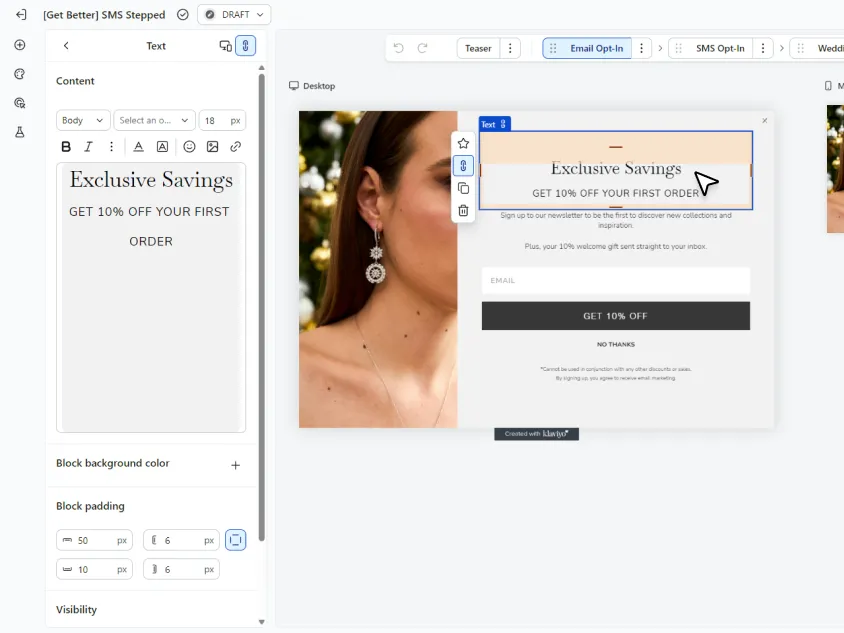
4. Customize the design and fields
Next, edit the form design. Keep it simple and focused. For most Shopify stores, a strong form needs:
- a clear headline;
- a short explanation of the value;
- an email field;
- an optional SMS field, if SMS is part of the strategy;
- a clear CTA button;
- a success message;
- consent language where needed.
Avoid asking for too much information too early. A long form may give you more data, but it can also reduce submissions. For many list growth forms, email address alone is enough to start.
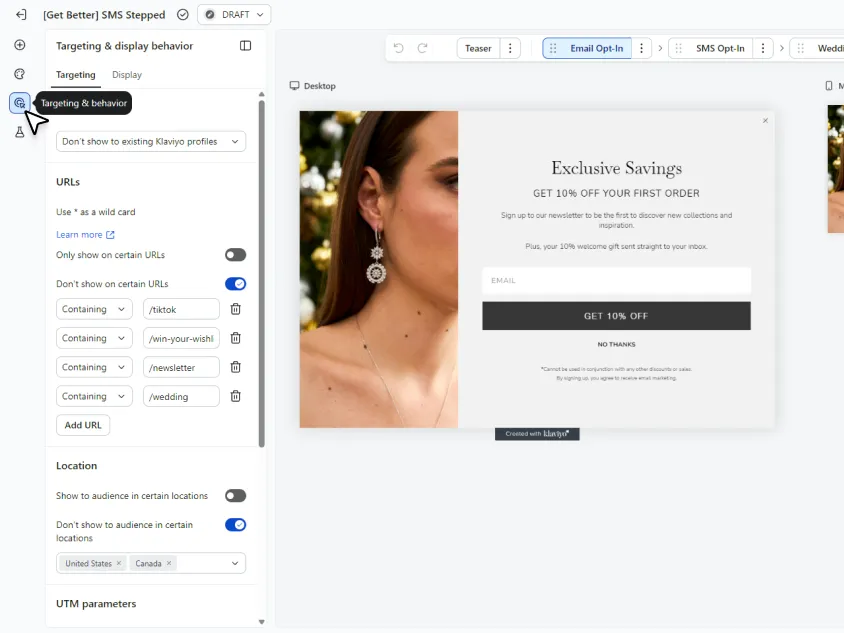
5. Set the form’s targeting and behavior
For popup, flyout, and full-page forms, targeting and behavior settings control when the form appears and who sees it. Klaviyo’s documentation describes this area as the place where you adjust display and targeting settings for an existing form.
Depending on your form type and strategy, you may want to adjust:
- when the form appears;
- whether it shows on desktop, mobile, or both;
- which pages it appears on;
- whether it appears only to new visitors;
- whether it is hidden from existing subscribers;
- how soon it can appear again after being closed.
This is especially important for Shopify stores. A popup that appears too quickly can interrupt the shopping experience. A form that appears too late may not collect enough subscribers. The right timing depends on the offer, page type, traffic source, and buyer intent.
6. Publish the form
Once the form is ready, publish it in Klaviyo. If the form is still in draft mode, it will not appear on your Shopify store.
After publishing, always test the form yourself before assuming it works. Open the store in an incognito window, check both desktop and mobile, submit a test email address, and confirm that the contact appears in the right Klaviyo list.
How to Add a Klaviyo Popup Form to Shopify
A Klaviyo popup form is usually the easiest form type to add to Shopify, as long as Klaviyo is properly installed and sign-up forms are enabled.
Here is the basic process:
- Create or open a popup form in Klaviyo.
- Connect the form to the correct list.
- Customize the design, copy, fields, CTA, and success message.
- Adjust the form’s targeting and behavior settings.
- Confirm that Klaviyo sign-up forms are enabled for your Shopify store.
- Publish the form.
- Test it on the live Shopify store.
The important part is that the form should not only look good. It should also appear at the right time, on the right pages, and for the right visitors.
For example, a first-time visitor discount popup may work well on the homepage or collection pages. A more specific offer may work better on product pages. A newsletter signup form may be better as an embedded footer form instead of a popup.
How to Embed a Klaviyo Form on a Shopify Page
Embedded Klaviyo forms are different from popups. A popup appears based on display rules, while an embedded form sits directly inside a page, section, footer, or template.
This makes embedded forms useful when you want a permanent signup area on your Shopify store. For example, you might add one to your footer, a landing page, a blog post, a product page, or a dedicated newsletter signup page.
Klaviyo’s Shopify documentation explains that embedded forms can be added by creating the form in Klaviyo, copying the form ID from the embed code, and adding the Klaviyo Embedded Form section in the Shopify theme editor. Klaviyo also notes that sign-up form functionality needs to be enabled for the Shopify store.
1. Create an embedded form in Klaviyo
Start in Klaviyo by creating a new sign-up form or opening an existing one.
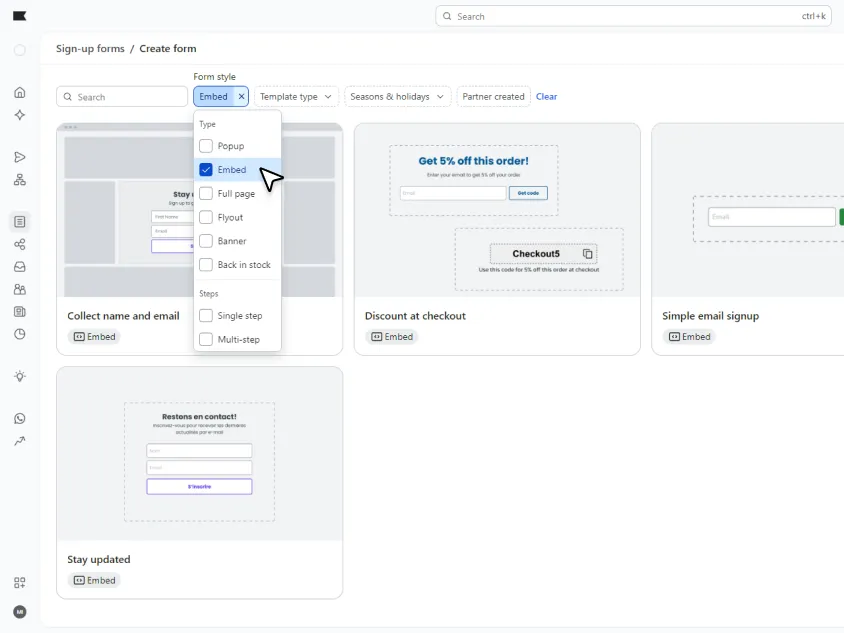
Choose Embed as the form type. This tells Klaviyo that the form should be placed directly into a page or section instead of appearing as a popup or flyout.
Before moving to Shopify, check the basics:
- the form is connected to the correct list;
- the headline and CTA are clear;
- the fields are not too long;
- the success message tells subscribers what happens next;
- the form design matches your Shopify store;
- the form is ready to be published.
2. Copy the form embed code or form ID
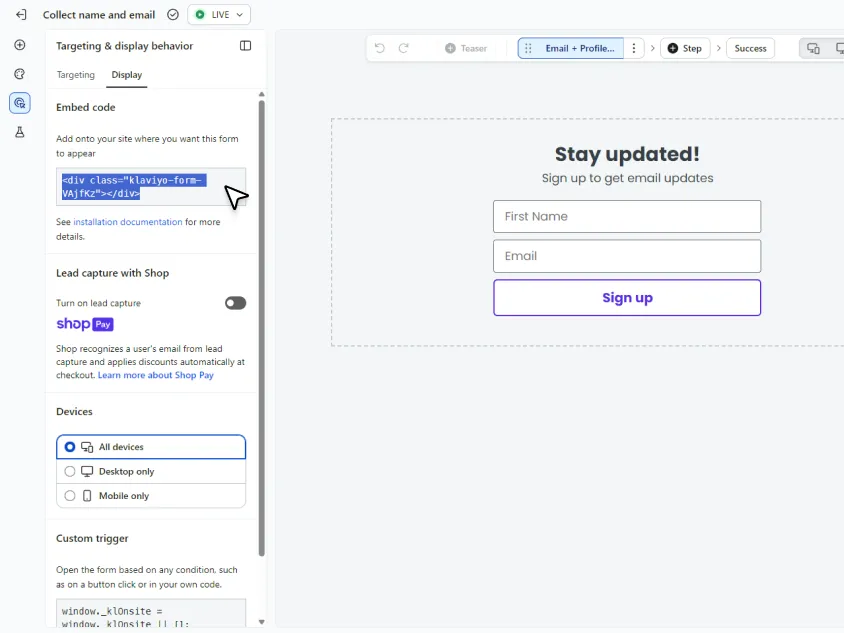
Once the embedded form is ready, Klaviyo will provide embed instructions. For Shopify, Klaviyo’s current help documentation says to copy the form ID from the form’s embed code and use it with the Klaviyo Embedded Form section in Shopify.
Keep the embed code or form ID somewhere easy to access while you open Shopify.
Be careful not to edit the code manually unless you know exactly what you are changing. If an embedded form does not show later, one of the first things to check is whether the embed code was added exactly as Klaviyo provided it.
3. Open your Shopify theme editor
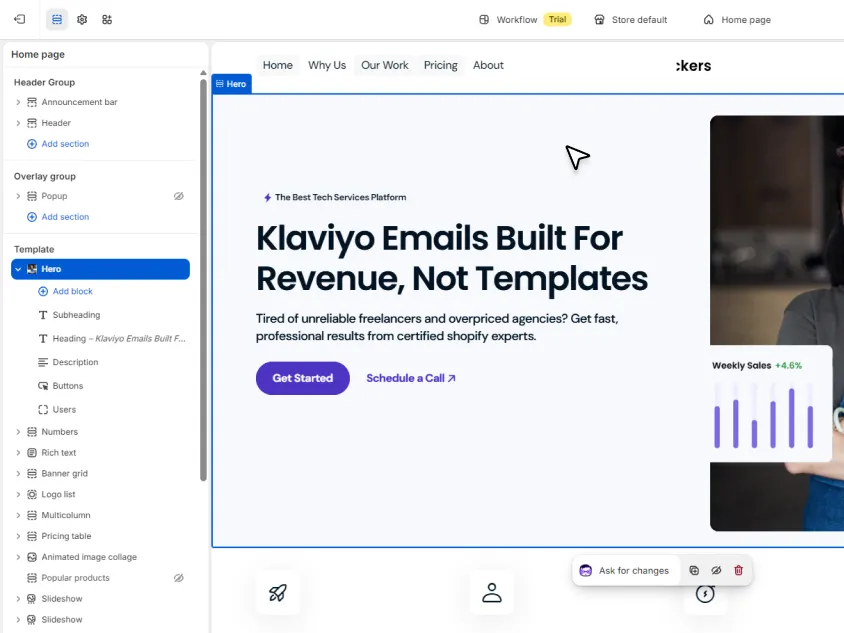
In Shopify, go to your store’s theme editor. Klaviyo’s Shopify embed form guide points users to Online Store > Themes > Customize before adding the Klaviyo Embedded Form section.
From there, open the page, template, or section where you want the form to appear.
This might be:
- the homepage;
- a footer section;
- a product page template;
- a custom landing page;
- a blog post template;
- a dedicated newsletter signup page.
The exact location depends on your Shopify theme. Some stores can add the Klaviyo Embedded Form section directly in the theme editor. Others may need a custom section, custom liquid block, or developer support, especially if the theme is heavily customized.
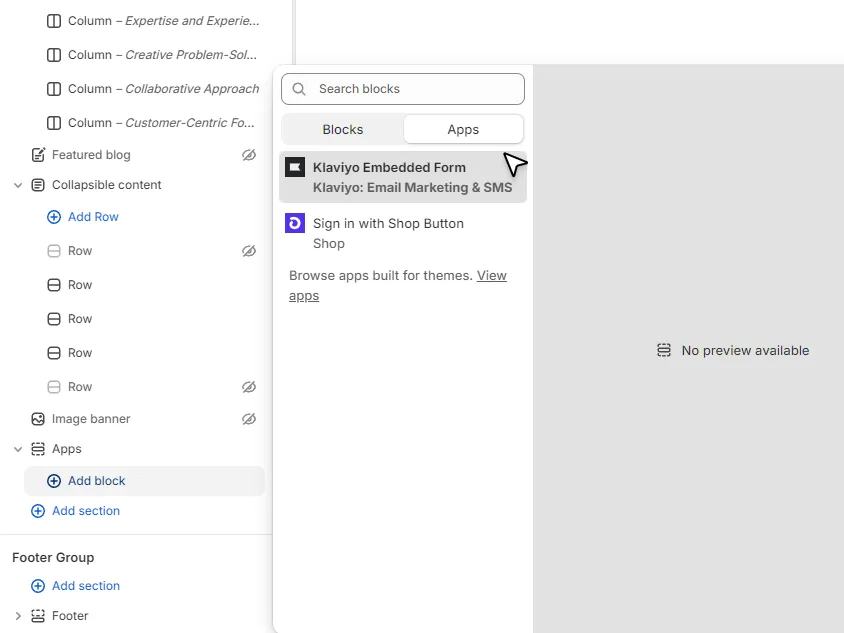
4. Add the Klaviyo Embedded Form section
Inside the Shopify theme editor, add a new section or app block where you want the form to appear. Look for the Klaviyo embedded form option.
Klaviyo’s documentation refers to this as the Klaviyo Embedded Form section. Once added, you can enter or paste the form ID so Shopify knows which Klaviyo form to display.
Place the form where it makes sense for the page. For example:
- near the bottom of a landing page;
- inside the footer;
- after useful content in a blog post;
- below product information on a product page;
- in a dedicated newsletter signup section.
Avoid placing the form somewhere that interrupts the shopping experience or pushes important product content too far down the page.
5. Save and preview the Shopify page
After adding the embedded form section, save the Shopify page or theme changes.
Then preview the page before sending traffic to it. Check that:
- the form appears in the right location;
- the spacing looks good;
- the form is readable on mobile;
- the CTA button is visible;
- the form does not overlap other page elements;
- the design feels consistent with the rest of the store.
If the form does not appear, do not assume the form is broken. It may still be a setup issue, such as the wrong form ID, app embed settings, display restrictions, or theme placement.
6. Submit a test email address
The final step is testing the form as a visitor would.
Open the Shopify page in an incognito or private browser window. Submit a test email address, then go back to Klaviyo and confirm that the subscriber appears in the correct list.
Also check whether the expected flow starts. For example, if the form submits to a list connected to your welcome series, the test profile should enter that welcome flow.
If the form looks correct but does not submit to the right list or trigger the expected flow, review the form settings before sending traffic to the page.
Where Should You Place Klaviyo Forms on Shopify?
Where you place a Klaviyo form matters almost as much as the form itself. A strong offer can still underperform if it appears on the wrong page, at the wrong time, or in a place visitors ignore.
For Shopify stores, the best placement depends on visitor intent. Someone reading a blog post may respond better to a newsletter signup. Someone viewing a product page may be more interested in a back-in-stock alert, product updates, or a first-order discount.
Here are some useful placement options:
| Placement | Best for |
|---|---|
|
Homepage popup |
First-time visitor offers, welcome discounts, newsletter growth |
|
Footer embedded form |
Always-visible newsletter signup without interrupting browsing |
|
Product page form |
Back-in-stock alerts, product interest, waitlists, or category-specific offers |
|
Landing page form |
Dedicated campaigns, lead capture, influencer traffic, paid traffic, or seasonal promotions |
|
Blog post form |
Content-driven subscribers, guides, educational content, and softer newsletter signup |
|
Exit-intent popup |
Capturing visitors before they leave, especially with a strong offer |
|
Cart or checkout-related form |
Use carefully; this area should not distract from purchase completion |
A popup can be useful for fast list growth, but it should not appear so aggressively that it blocks the shopping experience. An embedded form is usually better for permanent signup areas, such as the footer, a landing page, or a blog post.
For many Shopify stores, the best setup is a small form system: one main popup for new visitors, one footer form for always-on signup, and one or two more specific forms for product interest, content, or campaigns.
Why Your Klaviyo Form Is Not Showing on Shopify
If your Klaviyo form is not showing on Shopify, do not panic. In most cases, the issue is technical or rule-based: the form is not published, sign-up forms are not enabled, the display rules are too restrictive, or the embedded form was added to the wrong place.
Use this checklist to find the problem faster.
| Issue | What’s happening | How to fix it |
|---|---|---|
|
The form is not published |
The form may still be saved as a draft in Klaviyo, so it will not appear on your live Shopify store. |
Open the form in Klaviyo and confirm that it is published before testing it on your store. |
|
Klaviyo sign-up forms are not enabled |
Popup and flyout forms may not display if the Klaviyo app embed or sign-up form functionality is not enabled in the Shopify theme. |
Check your Shopify theme settings and make sure the Klaviyo app embed is enabled for the active theme. |
|
The display rules are too restrictive |
The form may be working, but the current visitor does not match the targeting rules. |
Review page URL, device type, visitor type, location, list membership, previous behavior, timing, and delay settings. |
|
The form is hidden on mobile or desktop |
Some forms are set to appear only on specific devices, so you may not see the form while testing. |
Check the form’s device settings and test on both desktop and mobile before assuming there is a technical issue. |
|
The embedded form was added to the wrong place |
The form may have been added to a different page, section, or theme template than the one you are checking. |
Go back to Shopify and confirm that the form was added to the exact page or template where it should appear. |
|
The wrong form ID was used |
A small copy-paste mistake can prevent the embedded form from loading or cause the wrong form to appear. |
Compare the form ID in Shopify with the correct embedded form ID from Klaviyo. |
|
Another popup or app is conflicting with it |
Other popup, consent, chat, quiz, or lead capture apps may interfere with scripts or create overlapping behavior. |
Check other active Shopify apps and test whether the form appears when conflicting popups or scripts are disabled. |
|
Cache or browser behavior is affecting your test |
Your browser may hide the form because you already closed it, submitted it, or matched a rule that prevents it from showing again. |
Test in an incognito window, clear cookies, try another browser, or use a new email address when checking list submission and flow triggers. |
How to Test Your Klaviyo Form Before Launch
Do not stop testing once the form appears on the page. A Klaviyo form can look correct and still submit to the wrong list, fail to trigger the right flow, or create a poor mobile experience.
Before launch, test the full signup experience from start to finish.
- Preview the form on desktop and mobile.
- Submit a new test email address.
- Confirm the profile appears in the correct Klaviyo list.
- Check the success message.
- Confirm the welcome or follow-up flow starts correctly.
- Test the close, delay, and re-display rules.
- Try an incognito window or another browser.
Testing is especially important for embedded forms, because a form can work on one page and not appear on another if the placement, template, or form ID is different. For popups, test after clearing cookies or using an incognito window so previous form behavior does not affect what you see.
FAQ: Klaviyo Forms on Shopify
How do I add a Klaviyo form to Shopify?
To add a Klaviyo form to Shopify, create and publish the form in Klaviyo, then make sure it is connected to the right list and enabled for your Shopify store. Popup and flyout forms can display automatically when sign-up forms are enabled, while embedded forms need to be added to the correct Shopify page, section, or theme template.
How do I embed a Klaviyo form on a Shopify page?
To embed a Klaviyo form on a Shopify page, create an embedded form in Klaviyo, copy the form ID or embed code, and add it to the correct Shopify page or theme section. Depending on your theme, you may use a Klaviyo embedded form section, an app block, a custom Liquid section, or a custom code area.
Can I add a Klaviyo popup to Shopify?
Yes. You can add a Klaviyo popup to Shopify when Klaviyo is connected to your store and sign-up forms are enabled in your Shopify theme. After publishing the popup in Klaviyo, use the form’s targeting and behavior settings to control when, where, and for whom it appears.
Why is my Klaviyo form not showing on Shopify?
A Klaviyo form may not show on Shopify if it is not published, sign-up forms are not enabled, the display rules are too restrictive, the form is hidden on that device, or the embedded form was added to the wrong page or template. Test in an incognito window and check the form’s targeting, placement, and publish status first.
Do Klaviyo embedded forms work on Shopify product pages?
Yes. Klaviyo embedded forms can work on Shopify product pages when they are added to the correct product template, section, or custom code area. They are useful for product interest forms, waitlists, back-in-stock alerts, or product-specific email capture. Always test the live product page and confirm that submissions go to the correct Klaviyo list.
Do I need coding to embed a Klaviyo form on Shopify?
Not always. Many Shopify themes let you add a Klaviyo embedded form through the theme editor, an app section, or an app block. You may need custom code if you want the form in a very specific location, if your theme does not support the section you need, or if you are working with a custom Shopify theme.
Can a Klaviyo form trigger a welcome flow?
Yes. A Klaviyo form can trigger a welcome flow when it submits subscribers to a list that is used as the flow trigger. To test this, submit a new email address through the form, then confirm that the profile appears in the correct list and enters the expected Klaviyo flow.
What is the best Klaviyo form type for Shopify?
The best Klaviyo form type for Shopify depends on the goal. A popup is useful for first-time visitor offers and list growth. An embedded form is better for permanent signup areas like footers, landing pages, blog posts, and product pages. A flyout works well when you want a softer prompt that feels less intrusive than a popup.
Do I need a popup, embedded form, or both?
Most Shopify stores benefit from using both. A good starting setup is one popup for first-time visitors and one embedded form for always-on newsletter signup. As your strategy grows, you can add more specific forms for product interest, back-in-stock requests, seasonal campaigns, or content-driven subscribers.
Need help setting up Klaviyo forms on Shopify?
Get support with your Klaviyo signup forms, including popup setup, embedded forms, Shopify integration checks, list connections, flow triggers, testing, and launch QA.