Klaviyo Welcome Flow for Shopify – All You Need to Know


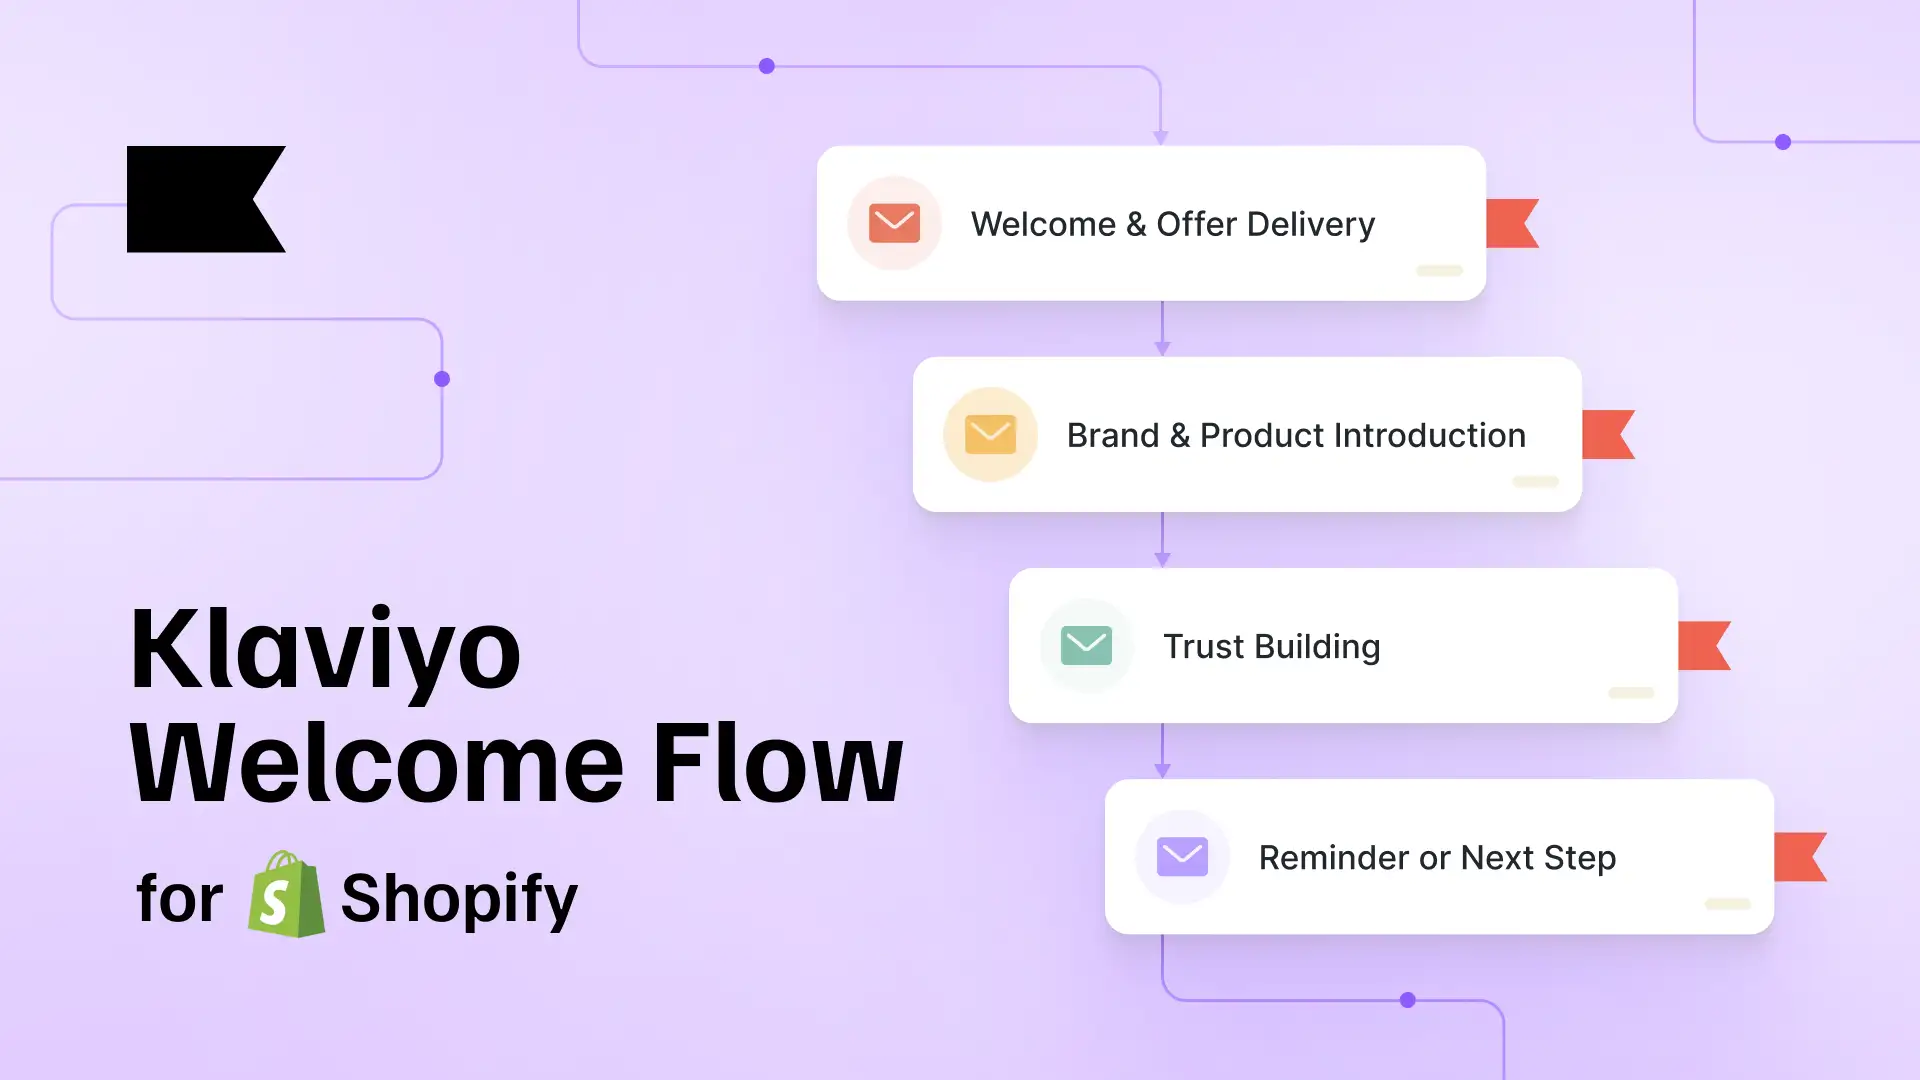
A Klaviyo welcome flow is usually the first automation a Shopify store should build after the integration and signup forms are in place. Because new subscriber attention does not stay warm for long.
The first message after signup has a simple job: keep the momentum going. It should deliver what the subscriber came for, make the next step obvious, and move them closer to a first purchase without overwhelming them.
This guide focuses on the welcome flow itself: the trigger, the email sequence, offer logic, segmentation, flow filters, and testing. We will not cover the full Klaviyo Shopify setup here. If the integration or forms are not ready yet, start with those first.
What Is a Klaviyo Welcome Flow for Shopify?
A Klaviyo welcome flow is an automated email or SMS sequence that starts after someone joins a selected Klaviyo list. For Shopify stores, that list is often connected to a signup form, footer form, landing page, discount popup, or checkout subscription source.
Klaviyo’s own welcome series guidance explains that a standard welcome flow can be created with an Added to list trigger, using the main subscriber list as the trigger list. Klaviyo also notes that welcome flows are commonly used to send an email immediately after signup, followed by additional messages over the next few days.
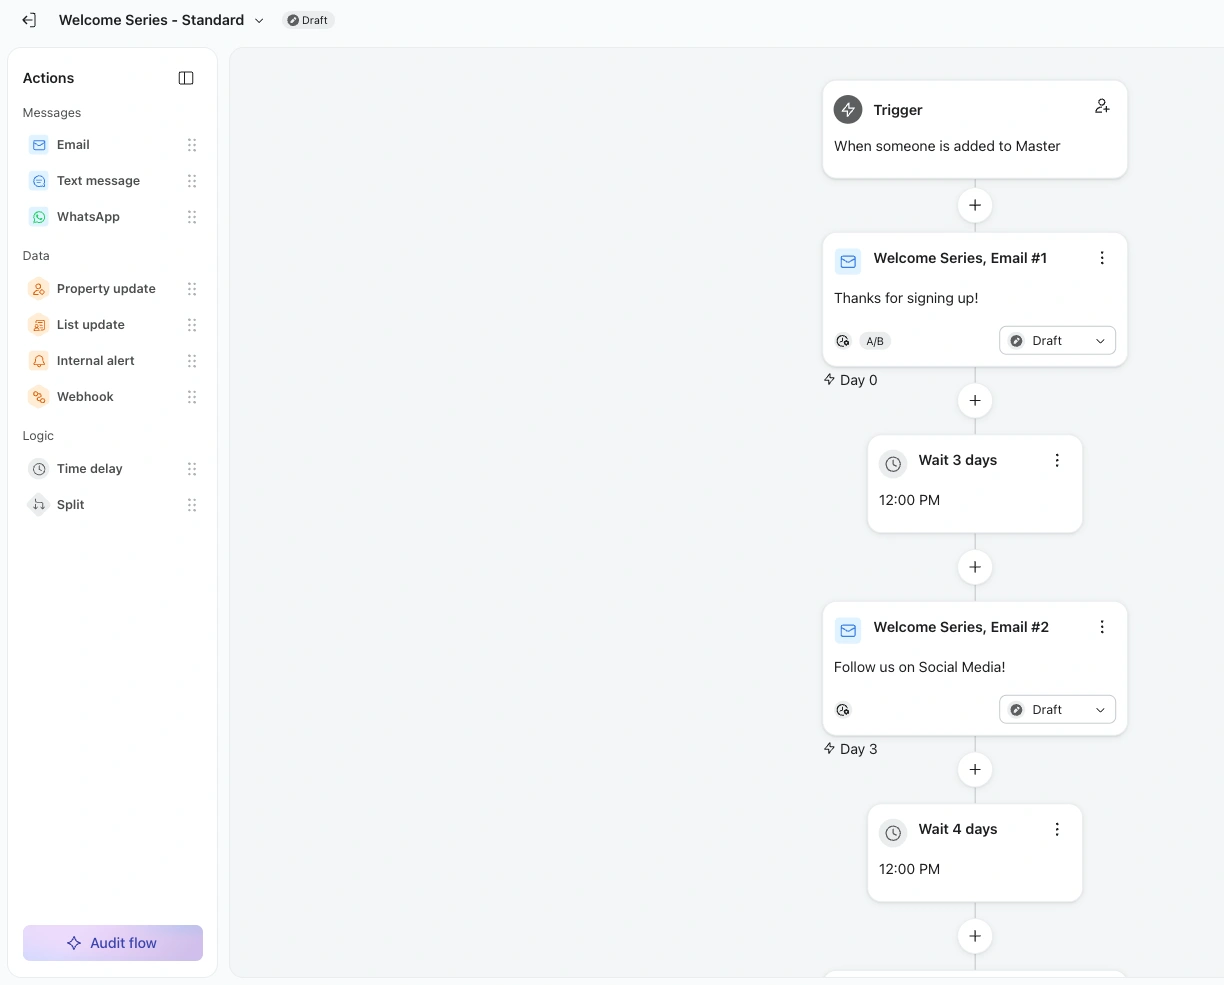
In practice, this is where a new subscriber’s first experience with your email program begins.
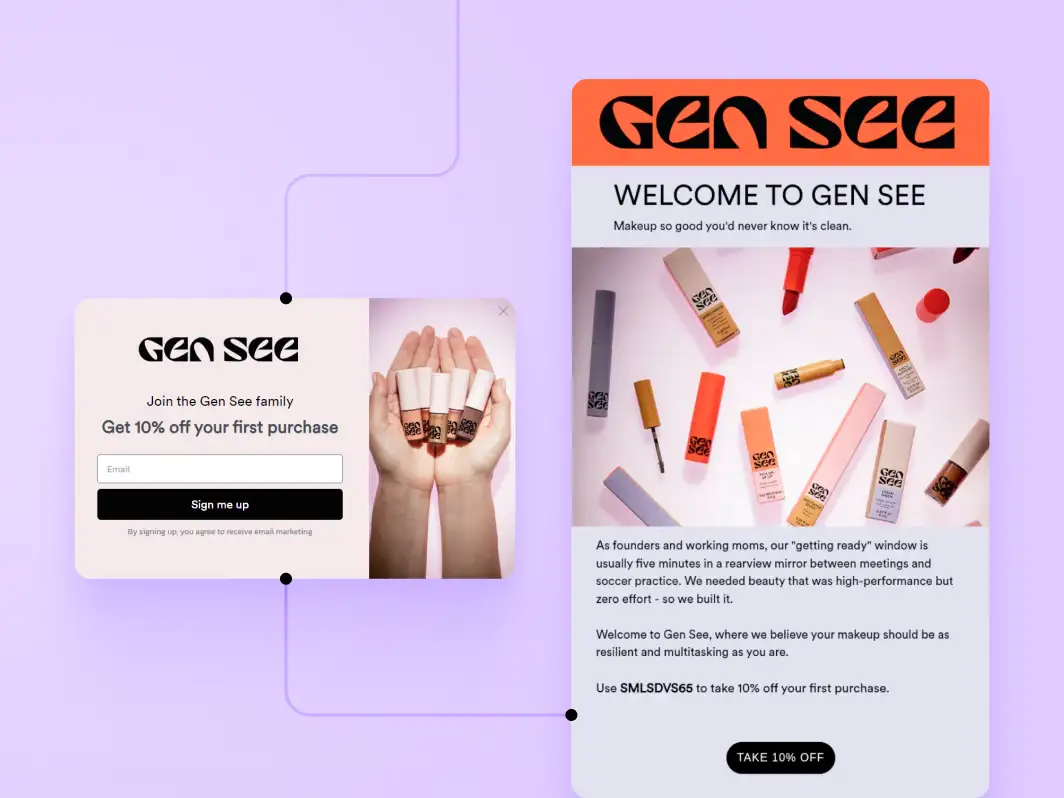
If your popup promised 10% off, the first welcome email should make that offer easy to use. If your form was more content-led, the flow may start with a brand introduction, best sellers, product education, or a useful next step. The right welcome flow depends on why the person signed up in the first place.
Here is a simple welcome flow example by Gen See: the subscriber signs up for 10% off, then receives the discount in the first welcome email.
A good Shopify welcome flow connects three things:
- the signup source;
- the subscriber’s expectation;
- the next action you want them to take.
That is what separates a welcome flow from a generic “thanks for subscribing” email.
Where the Welcome Flow Fits in Your Shopify Setup
A welcome flow does not work in isolation. It sits between the signup moment and the first meaningful action you want a new subscriber to take.
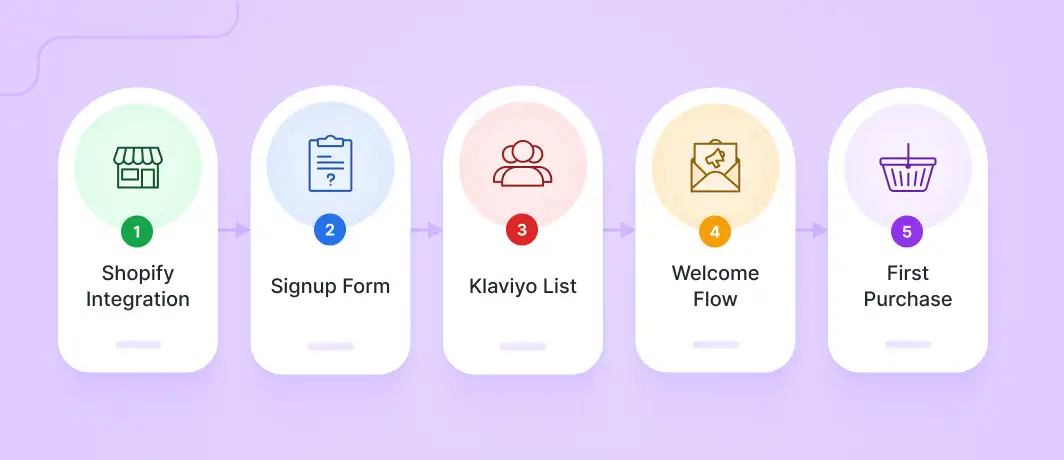
For most Shopify stores, the path looks like this:
- Shopify connects to Klaviyo, so store and customer data can sync.
- A subscriber joins through a signup form, popup, footer form, or landing page.
- That subscriber is added to the selected Klaviyo list.
- The welcome flow starts and sends the first email or sequence.
- The flow guides the subscriber toward a first purchase or stronger engagement.
The welcome flow should be planned together with the form that triggers it. A footer newsletter form, a discount popup, and a product-interest signup may all add people to Klaviyo, but they do not have to trigger the same welcome flow.
You can use one welcome flow for all entry points or different welcome flows depending on where the person subscribed from.
How to Set Up a Klaviyo Welcome Flow for Shopify
To build a welcome flow in Klaviyo, start with the signup source and the list that should trigger the flow.
1. Choose signup source and list that triggers the flow
Most Klaviyo welcome flows start when someone is added to a specific list. For Shopify stores, this is usually the list connected to a signup form, newsletter form, discount popup, or landing page form.
Choose the list carefully. If every form on the store submits to the same list, every subscriber may enter the same welcome flow, even if they signed up for different reasons.
A simple newsletter signup and a discount popup can often share one welcome flow. A product waitlist, quiz result, or campaign-specific landing page may need a different follow-up.
2. Create the welcome flow in Klaviyo
In Klaviyo, create a new flow and use the selected list as the trigger. You can start from a Klaviyo template or build the flow from scratch.
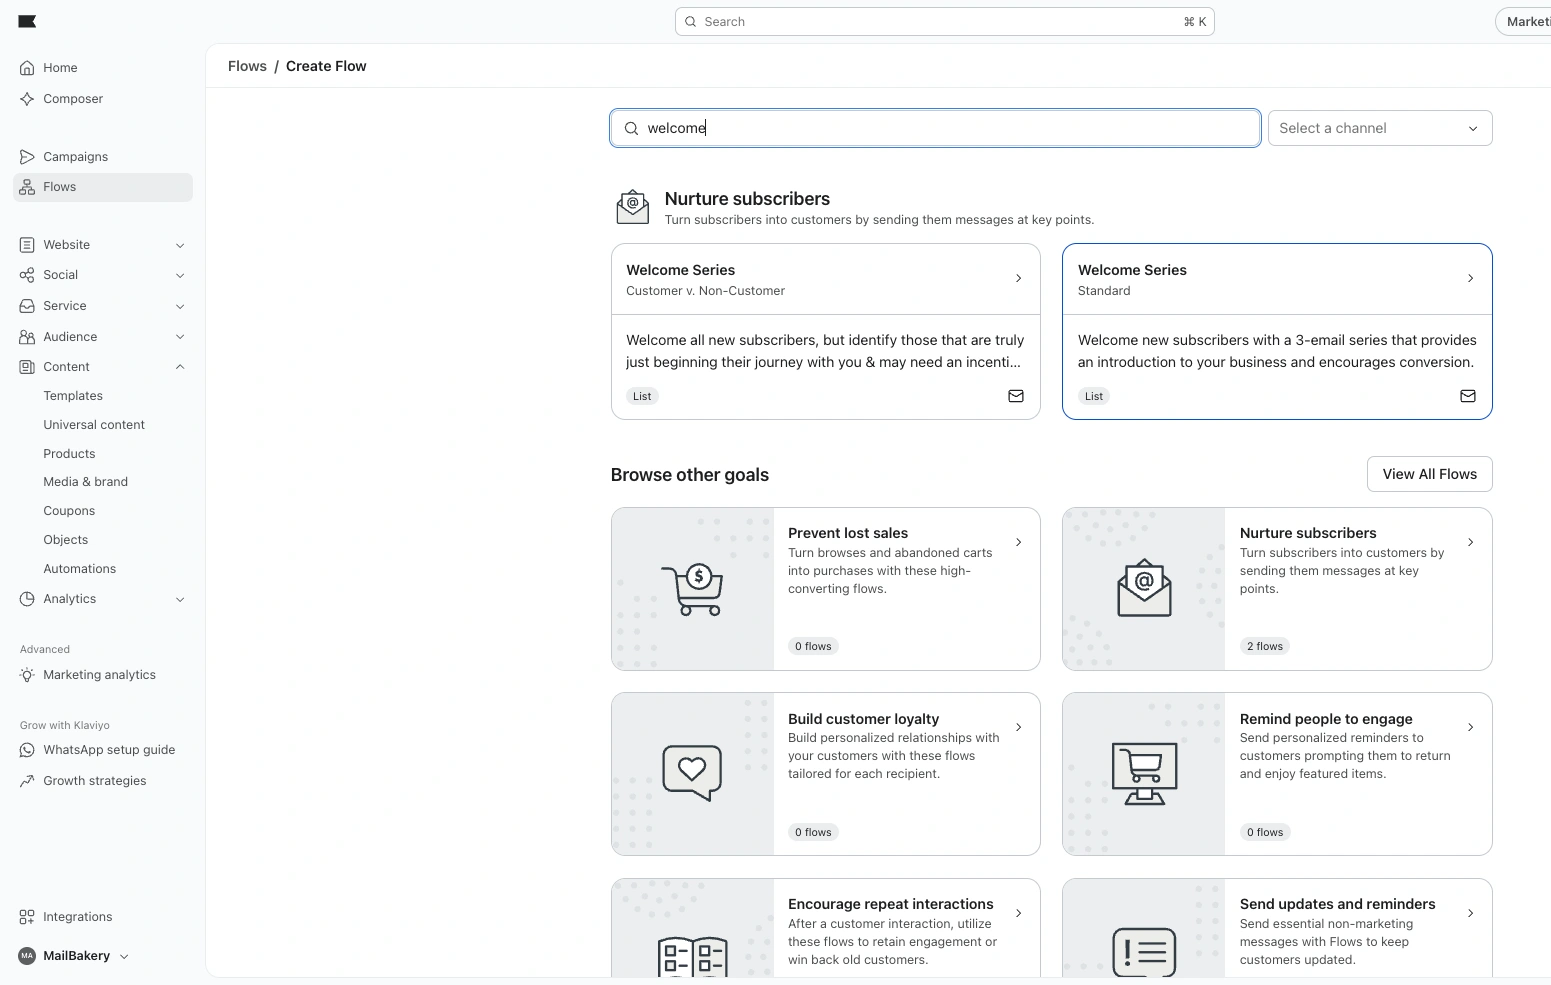
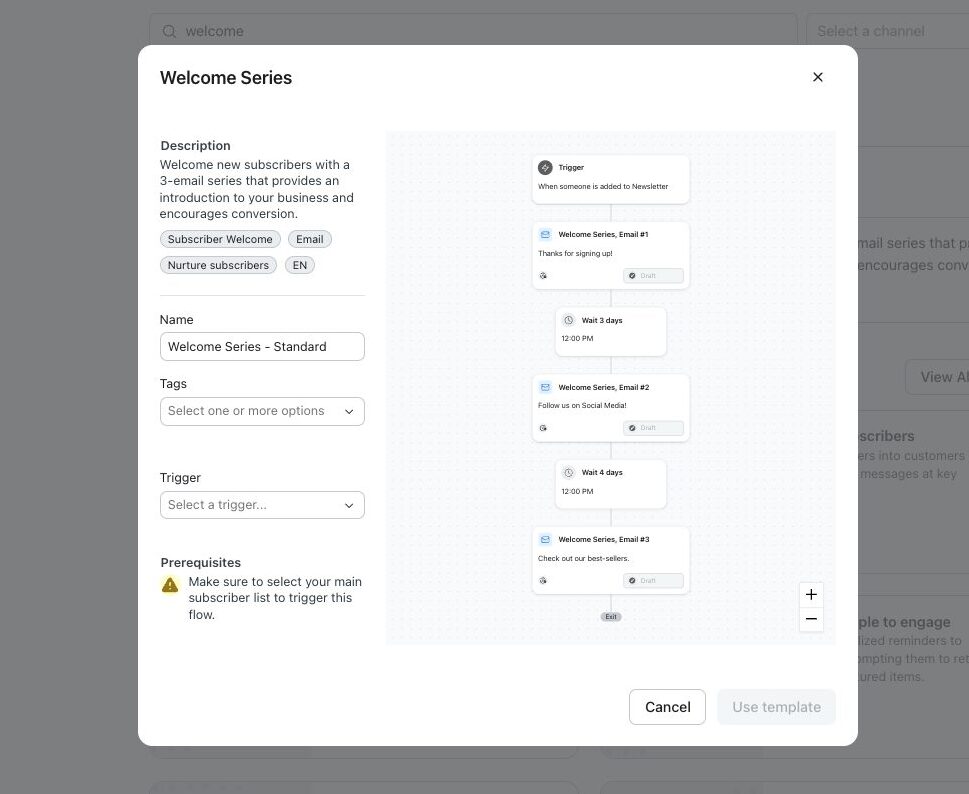
Templates are useful as a starting point, but do not leave the sequence generic. The flow should match your store’s offer, product type, brand tone, and buying cycle.
If the signup form promises a discount, the first email should deliver it clearly. If the form promises updates, education, or early access, the first email should match that expectation instead.
3. Add the first welcome email
The first email should arrive quickly after signup. This is when the subscriber is most likely to remember the form they submitted.
For most Shopify stores, the first welcome email should:
- confirm the signup;
- deliver the promised offer, if there is one;
- introduce the brand briefly;
- give the subscriber one clear next step.
Do not make the first email do too much. If the subscriber joined for a discount code, make the code easy to find. If they joined for product updates, guide them to the most relevant category, collection, or next action.
4. Add follow-up emails
After the first message, use the next emails to build confidence and help the subscriber decide what to do next.
A follow-up email can introduce best sellers, explain what makes the products different, show reviews, answer common objections, or point subscribers to useful content. The goal is not to repeat the first email with a different subject line. Each email should move the subscriber one step further.
For many Shopify stores, a welcome flow works well with three to four emails. Short buying cycles may need fewer. Higher-consideration products may need more education before pushing for a sale.
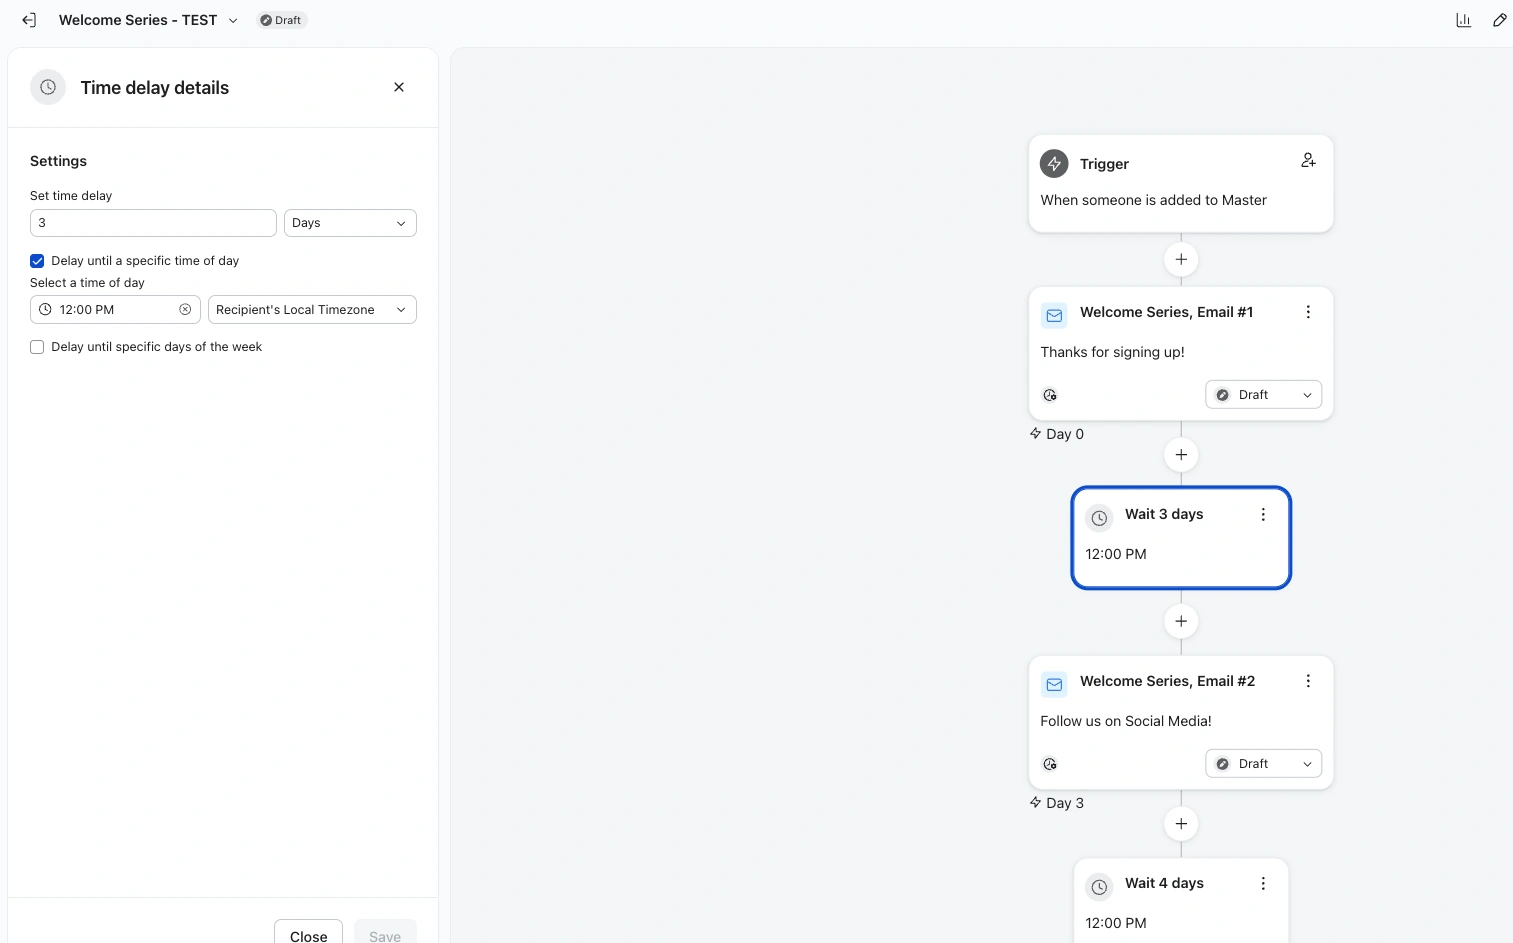
5. Add timing between emails
Give subscribers enough space between messages. Sending several emails too quickly can make the flow feel aggressive, especially if the person has not had time to browse or buy.
A common starting point is to send the first email immediately, then wait a day or two before the next message. Later emails can be spaced out based on the offer, product price, and how much education the subscriber needs.
The timing should feel intentional. If every email says “don’t miss out,” the sequence will get tired fast.
6. Add filters and exclusions
Flow filters help keep the welcome flow from sending the wrong message to the wrong person.
For example, you may want to stop discount reminders for someone who has already placed an order. You may also want different messaging for existing customers, SMS subscribers, or people who came from a specific form.
This does not need to be complex at the start. Even a few basic filters can prevent awkward moments, like sending a first-purchase discount to someone who just bought.
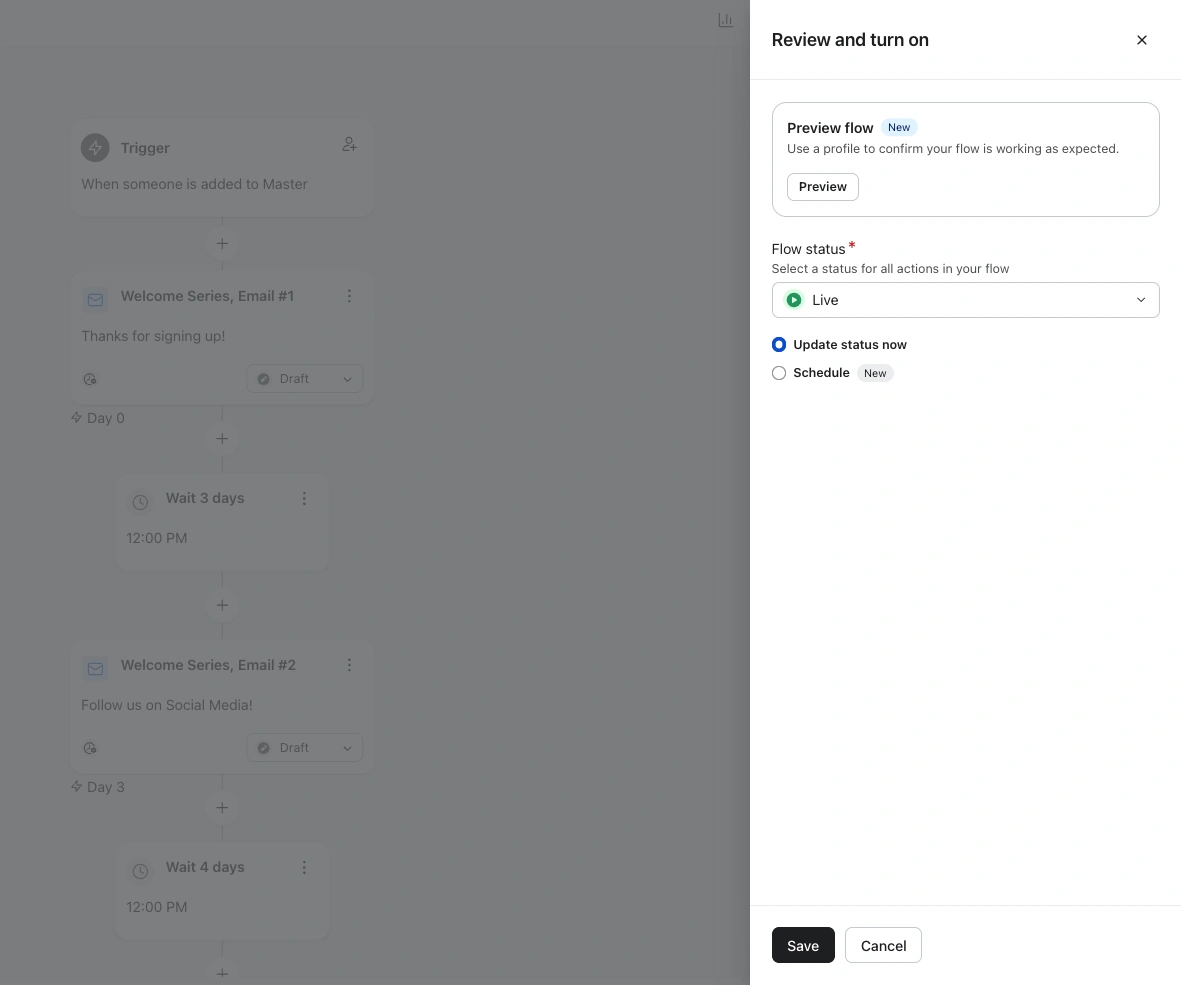
7. Test and turn the flow live
Before turning the flow live, test it from the signup source, not only inside the flow builder.
Submit a test email through the actual Shopify form, then check whether the profile enters the expected list and starts the welcome flow. Review the first email, coupon code, links, mobile rendering, and timing.
If the store already uses Shopify Email, Mailchimp, Omnisend, or another platform, check whether any old welcome emails are still active before turning the Klaviyo flow live.
A welcome flow can look finished in Klaviyo and still break at the signup source. Test the full path before sending real subscribers through it.
If you are planning the rest of your automation setup, use our guide to the best Klaviyo flows for Shopify stores to decide what to build next.
Recommended Klaviyo Welcome Flow Structure for Shopify
There is no single welcome flow structure that works for every Shopify store. A low-price impulse product, a skincare brand, a furniture store, and a subscription brand will not need the exact same sequence.
Still, many Shopify welcome flows start with three to four emails. That gives you enough room to deliver the signup promise, introduce the brand, guide product discovery, and follow up before the subscriber goes cold.
| Goal | What to include | |
|---|---|---|
|
Email 1 |
Welcome and offer delivery |
Thank the subscriber, deliver the discount or promised value, and give one clear next step. |
|
Email 2 |
Brand and product introduction |
Introduce best sellers, key categories, product benefits, or what makes the brand different. |
|
Email 3 |
Trust building |
Add reviews, social proof, shipping details, return policy, FAQs, or product education. |
|
Email 4 |
Reminder or next step |
Remind subscribers about the offer, recommend products, or guide them toward another useful action. |
This structure is a starting point, not a rule. Some stores only need two emails. Others need more time to educate subscribers before asking for a purchase.
The right structure depends on why someone subscribed, the product type, and how much confidence a new subscriber needs before taking the next step.
Welcome Flow Offer Logic
Not every Shopify welcome flow needs a discount. But if the signup form promises one, the flow needs to deliver it clearly and quickly.
A popup that says “Get 10% off your first order” creates a very different expectation from a footer form that says “Join our newsletter.” If both subscribers enter the same welcome flow, one of them may get a message that feels slightly off.
For discount-based welcome flows, decide how the offer will work before you build the emails:
- Is the code static or unique?
- Does it expire?
- Can existing customers use it?
- Is it valid on all products or only selected collections?
- Should reminder emails stop after someone places an order?
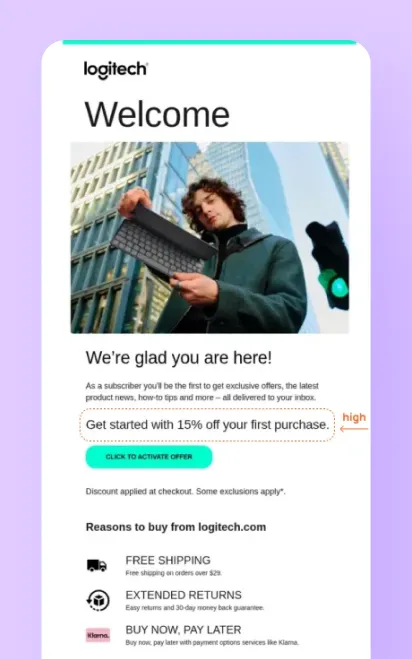
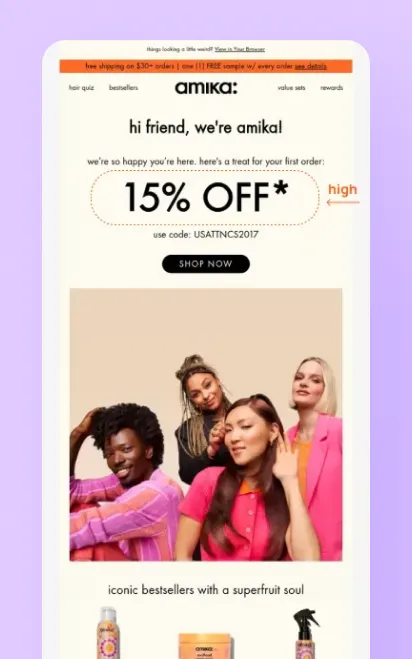
If the discount is the main reason someone signed up, put it near the top of the first email. Do not hide it under a long brand story. You can introduce the brand later in the sequence.
For non-discount welcome flows, the value has to come from somewhere else. That might be early access, product education, a buying guide, a quiz result, a new collection preview, or useful content. The subscriber still needs a reason to keep opening after the first message.
The safest rule is simple: do not promise one thing in the form and deliver something else in the flow.
What Should Each Welcome Email Say?
A welcome flow works best when every email has a different job. If each message repeats the same discount reminder, the sequence starts to feel thin very quickly.
Email 1: Welcome and deliver the promise
The first email should match the reason someone signed up. If the form promised a discount, early access, free shipping, or a guide, deliver it clearly near the top of the email.
Keep the message focused. Thank the subscriber, give them the promised value, and point them to the best next step: shop best sellers, browse a collection, take a quiz, or learn more about the brand.
Subject Line
Welcome — here’s your offer
Preview Text
Thanks for joining us. Your first step starts here.
Body
Hi [First Name],
Welcome to [Brand Name].
Thanks for joining our list. Here is your [discount/free shipping/early access/guide], just as promised:
[CODE / OFFER DETAILS]
Use it to explore our best sellers, find your first favorite, or take a look at what customers are loving right now.
[Shop Best Sellers]
We are glad you are here.
The [Brand Name] Team
Welcome to [Brand Name].
Thanks for joining our list. Here is your [discount/free shipping/early access/guide], just as promised:
[CODE / OFFER DETAILS]
Use it to explore our best sellers, find your first favorite, or take a look at what customers are loving right now.
[Shop Best Sellers]
We are glad you are here.
The [Brand Name] Team
Email 2: Introduce the brand or product range
The second email can give subscribers a better reason to care. This is where you can explain what makes the brand different, introduce best-selling products, highlight key categories, or show how customers usually choose between products.
For Shopify stores with many products, this email is useful for product discovery. Instead of sending subscribers to the homepage, guide them toward the collections or products that make the most sense for a new visitor.
Subject Line
A good place to start
Preview Text
Not sure what to choose first? Start here.
Body
Hi [First Name],
If you are new to [Brand Name], here is the easiest way to get started.
Our customers usually begin with:
[Category/Product 1]
Best for [use case or customer need].
[Category/Product 2]
A good choice if you want [benefit].
[Category/Product 3]
Made for [specific need or situation].
Whether you are shopping for [goal/problem/occasion], we created our products to help you find something that fits your routine, style, or needs.
[Explore the Collection]
If you are new to [Brand Name], here is the easiest way to get started.
Our customers usually begin with:
[Category/Product 1]
Best for [use case or customer need].
[Category/Product 2]
A good choice if you want [benefit].
[Category/Product 3]
Made for [specific need or situation].
Whether you are shopping for [goal/problem/occasion], we created our products to help you find something that fits your routine, style, or needs.
[Explore the Collection]
Email 3: Build trust
By the third email, the subscriber may still be interested but unsure. Use this message to reduce hesitation.
Good trust-building content can include reviews, customer photos, press mentions, shipping details, return policy notes, product benefits, FAQs, or a short explanation of how the product works. The point is not to overload the email. Choose the proof that matters most for the purchase decision.
Subject Line
Why customers come back
Preview Text
A few reasons people choose [Brand Name].
Body
Hi [First Name],
Trying a new brand can feel like a small leap.
So here are a few reasons customers choose [Brand Name]:
“[Short customer review or testimonial]”
If you are still deciding, take a look at our most-loved products and see what makes them a good place to start.
[See Customer Favorites]
Trying a new brand can feel like a small leap.
So here are a few reasons customers choose [Brand Name]:
- [Benefit or product quality point]
- [Shipping, return, or guarantee detail]
- [Customer review or social proof point]
- [Brand value, material, ingredient, or process detail]
“[Short customer review or testimonial]”
If you are still deciding, take a look at our most-loved products and see what makes them a good place to start.
[See Customer Favorites]
Email 4: Give a final reminder or next step
If your welcome offer expires, the last email can remind subscribers before the deadline. Keep it clear, not desperate.
If there is no discount, use the final email to guide the subscriber somewhere useful: best sellers, a starter collection, educational content, product recommendations, or a quiz. The goal is to keep the relationship moving, even if the subscriber is not ready to buy immediately.
Subject Line
Still thinking it over?
Preview Text
Here is one more place to start.
Body
Hi [First Name],
Just a quick reminder before you go.
If you joined for an offer, you can still use it here:
[CODE / OFFER DETAILS]
If you are not ready to buy yet, that is okay too. You can start with our best sellers, browse by category, or learn more about what makes [Brand Name] different.
[Shop Best Sellers]
Thanks again for joining us. We will keep sending useful updates, new arrivals, and helpful ideas your way.
The [Brand Name] Team
Just a quick reminder before you go.
If you joined for an offer, you can still use it here:
[CODE / OFFER DETAILS]
If you are not ready to buy yet, that is okay too. You can start with our best sellers, browse by category, or learn more about what makes [Brand Name] different.
[Shop Best Sellers]
Thanks again for joining us. We will keep sending useful updates, new arrivals, and helpful ideas your way.
The [Brand Name] Team
Segmentation and Flow Filters to Consider
A welcome flow should not treat every subscriber as the same person. Some people are brand new. Some are already customers. Some joined from a discount popup, while others came from a footer form, quiz, or product-specific page.
You do not need advanced segmentation on day one, but a few basic filters can make the flow much cleaner.
| Filter or split | Why it helps |
|---|---|
|
Has placed order since starting the flow |
Stops unnecessary discount reminders after someone buys. |
|
Is already a customer |
Lets you change the message from first-purchase encouragement to repeat engagement. |
|
Signup source |
Helps match the welcome message to the form, page, or offer that brought the subscriber in. |
|
Email vs SMS consent |
Keeps channel messaging cleaner if your form collects both email and phone numbers. |
|
Received another active flow |
Helps avoid overlapping messages when someone qualifies for more than one automation. |
The most important filter for many Shopify stores is purchase behavior. If someone signs up, receives the first email, and places an order, they probably do not need three more emails pushing the same first-order discount.
Existing customers are another group worth thinking about. If someone has already purchased and then joins your newsletter, they may still belong in a welcome flow, but the message should not pretend they have never heard of the brand.
Keep this simple at first. Start with the filters that prevent awkward or duplicate messaging, then refine the flow once you have real subscriber and purchase data.
How to Test Your Klaviyo Welcome Flow Before Launch
Before turning the welcome flow live, test the full path from signup to email delivery. Do not only preview the emails inside Klaviyo. The flow needs to work from the actual Shopify signup source.
Start with a fresh test email address and submit the form that should trigger the flow. Then check the profile in Klaviyo and follow what happens next.
Before launch, check:
- the test profile enters the intended Klaviyo list;
- the welcome flow starts from the right trigger;
- Email 1 sends at the expected time;
- the discount code works, if the flow includes one;
- links and buttons go to the right Shopify pages;
- the emails look good on mobile;
- flow filters behave as expected;
- purchasers are excluded from unnecessary discount reminders;
- old welcome emails from another platform are paused or reviewed.
This is also the moment to check the subscriber experience, not just the technical setup. If the popup promises a discount, the first email should deliver it without making people search. If the flow introduces products, the links should lead somewhere useful, not just to the homepage.
A welcome flow can look polished and still miss the basics. Test it like a customer, not like the person who built it.
FAQ: Klaviyo Welcome Flow for Shopify
What is a Klaviyo welcome flow?
A Klaviyo welcome flow is an automated email or SMS sequence that starts when someone joins a selected Klaviyo list. For Shopify stores, it is usually triggered by a signup form, discount popup, footer form, landing page form, or newsletter subscription source.
How do I create a welcome flow in Klaviyo for Shopify?
To create a welcome flow in Klaviyo for Shopify, choose the Klaviyo list that receives new subscribers, create a flow with that list as the trigger, add your welcome emails, set timing between messages, add filters where needed, and test the full path from Shopify signup to email delivery.
What should be in a Shopify welcome flow?
A Shopify welcome flow should usually include a first welcome email, the promised offer or signup value, a short brand introduction, product discovery, trust-building content, and a clear next step. The exact content depends on why the person signed up and what you want them to do next.
How many emails should a Klaviyo welcome flow have?
Many Shopify welcome flows start with three to four emails. That is usually enough to deliver the signup promise, introduce the brand, show useful products or categories, and follow up once or twice. Short buying cycles may need fewer emails, while higher-consideration products may need more education.
Should my welcome flow include a discount?
A welcome flow should include a discount if the signup form promised one. If the form did not promise a discount, you can still create value through early access, product education, buying guides, best sellers, quiz results, or useful content. The offer should match the signup source.
What triggers a Klaviyo welcome flow?
A Klaviyo welcome flow is commonly triggered when someone is added to a specific Klaviyo list. For Shopify stores, that list may be connected to a popup, embedded form, footer signup, landing page form, or checkout subscription source.
Can customers enter a welcome flow more than once?
A customer can enter a welcome flow again depending on how the flow trigger and filters are set up. In most cases, you should avoid sending the same welcome sequence repeatedly to the same person. Use flow filters and list strategy to control who enters and when.
Should existing customers get the same welcome flow as new subscribers?
Not always. Existing customers already know the brand and may not need the same first-purchase message or discount reminder as a new subscriber. If existing customers join your list, consider using different messaging that focuses on repeat engagement, product discovery, loyalty, or new arrivals.
Need help turning new subscribers into customers?
Your welcome flow is one of the first places where new subscribers decide whether your brand is worth their attention. The right setup should deliver the signup promise, introduce your products, guide the next step, and avoid awkward automation mistakes.
At MailBakery, we help Shopify brands plan, design, code, set up, and test Klaviyo welcome flows that feel on-brand and work properly from signup to launch.